
TL;DR: I wrote an update to Dan Foreman-Mackey’s template for wrapping C functions in Python.
A while ago I had to wrap some C++ code (belonging to the numerical solver, oscode, I developed) in Python.
My supervisor suggested using Dan Foreman-Mackey’s blogpost as a starting point, and I found it extremely useful. It gives an example of how to wrap a function using the Python-C API and a detailed explanation. However, since it has been posted, Python bumped from 2.x to 3.x, with support for the popular 2.7 having ended in January 2020. As suggested by the change in first digit in the version number, some of the changes are major, including some changes in how one should use numpy in the Python-C API. Numpy is such a commonly used library that I thought it would be worth putting an update out there for anyone facing the (terrifying) API for the first time. It is worth mentioning that a commenter has also thought of doing this, see their code here.
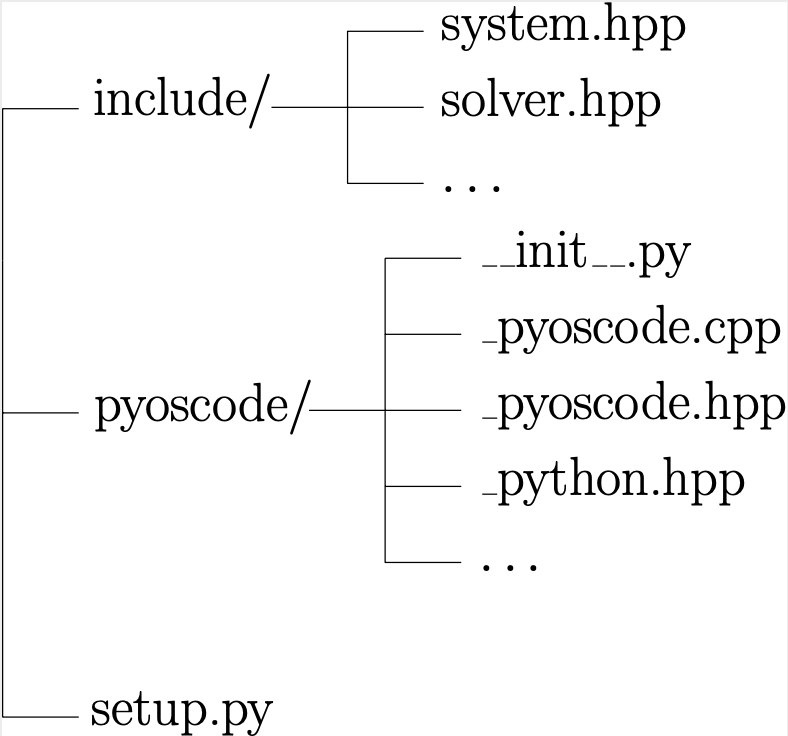
The directory structure
Before we get into the wrapping process, this graph show the overall
file structure of this project, which you can come back to for reference.
The C++ code’s name is oscode, and we’ll call the Python interface to it
pyoscode.
The C/C++ code
In this example we will wrap oscode, which is a header-only project. This
means that all code resides in .hpp header files and for use in C++, one only needs
to download these files and it is not necessary to compile them with make. It
also means that declarations and definitions reside in the same file, for
example in include/solver.hpp:
#pragma once
#include "system.hpp"
// Various other includes...

// Class declaration
class Solution
{
    public:
    // Constructor of the class "Solution"
    Solution(de_system &de_sys, std::complex<double> x0,
             std::complex<double> dx0, double t_i, double t_f,
             int o=3, double r_tol=1e-4, double a_tol=0.0,
             double h_0=1, const char* full_output="");
    // Method to solve the ODE
    void solve();
    // Attributes that will contain the solution and other
    // info about the run
    int ssteps, totsteps, wkbsteps;
    std::list<std::complex<double>> sol, dsol;
    std::list<double> times;
    std::list<bool> wkbs;

    private:
    // Rest of the class attributes and methods declared
}

// Class definition
Solution::Solution(de_system &de_sys, std::complex<double> x0,
                   std::complex<double> dx0, double t_i, double t_f,
                   int o, double r_tol, double a_tol, double h_0,
                   const char* full_output){

    // Things that happen on class initialization
}

// Class methods
void Solution::solve(){

    // Things that happen when solve() is called
}
Let’s run through what the above code does:
#pragma oncemakes sure this file is only included once in a single compilation. It is a preprocessor directive.- We then include the header
include/system.hpp, which contains a class calledde_system. This stores all information about the ODE system the user wishes to solve, and will be an input to the solver function (Solution::solve()). - Then we declare the class
Solution. This is the module that carries out the ODE solving and stores information about the solution which the user can then retrieve. It has some methods and attributes:- It has a constructor, which has the same function as the
__init__()in Python, it gets called when the class is initialized. As you see it has several inputs: the ODE itself, stored inde_system; the initial conditionsx0anddx0; the integration limitst_iandt_f; them some precision parameters; and a stringfull_outputcontaining the path to a file in which the output of the run is written. All parameters that have some default value set, e.g.double h_0=1, are optional. - It has a method called
solve(), which does the solving of the ODE. - It has some empty lists containing the solution, its derivative, and some more information about the run.
- It has a constructor, which has the same function as the
- In the same file we have the class definition, i.e. the actual content of the
function
Solution::Solution()and its methodSolution::solve().
Our goal is to wrap the Solution::solve() function, but we’ll have to, in the
wrapper, first define the differential equation via the de_system class, then create a Solution instance with the required initial conditions, tolerance requirements, etc., and only then call solve() on that instance.
The wrapper
In our case the wrapper will consist of the following files, whose names start with an underscore by convention:
pyoscode/_python.hpp,pyoscode/_pyoscode.hpp,pyoscode/_pyoscode.cpp,
and the ‘interface’,
pyoscode/__init__.py,
Let’s start with _python.hpp.
_python.hpp
#pragma once
#include <Python.h>
#if PY_MAJOR_VERSION >=3
#define PYTHON3
#endif
The only role of this file is to check the
version of Python we’re using and set a flag (PYTHON3) accordingly. Other files will
include this one to know the value of the flag, which is important because the
syntax of the wrapper is different for Python 2.x and 3.x.
_pyoscode.hpp
_pyoscode.cpp contains the functions wrapping the C++ functionality, and the
corresponding header _pyoscode.hpp declares those functions. Some of these
functions are special, as we’ll see below. So let’s start declaring in
_pyoscode.hpp:
#pragma once
#include <array>
#include "_python.hpp"
// Many more includes...

// Docstring for the module
static char module_docstring[] =
"pyoscode: this module provides an interface for oscode, for solving oscillatory ordinary differential equations with the RKWKB method.";

// Docstring for the Solution::solve() function
static char solve_docstring[] =
"Runs the solver";

// Available functions in the pyoscode module
static PyObject *_pyoscode_solve(PyObject *self, PyObject *args, PyObject
*kwargs);

// Module interface
static PyMethodDef module_methods[] = {
    {"solve", (PyCFunction) _pyoscode_solve, METH_VARARGS | METH_KEYWORDS,
    solve_docstring},
    {NULL, NULL, 0, NULL}
};

#ifdef PYTHON3
static struct PyModuleDef _pyoscodemodule = {
    PyModuleDef_HEAD_INIT,
    "_pyoscode",
    module_docstring,
    -1,
    module_methods
};
#endif
Apart from including the necessary modules (_python.hpp for knowing the Python
version, <array> for arrays, etc), here we define a short docstring
for the module and for the methods in the module and store them in static
chars.
We then have to declare all functions that we’ll be able to call in the
pyoscode module. The name of these functions, conventionally, is _<module
name>_<method name>, in an attempt to imitate namespaces. The functions take
and return PyObject types, which refer to all Python types, from ints to
classes. The first PyObject argument, self, points the module itself,
args is a tuple of positional arguments and kwargs are the keywords arguments
to solve().
We still have to specify the relationship between the module and its methods we
declared. As explained in Dan’s
blogpost, for more methods, one
needs to add more lines like the one following the static PyMethodDef ...,
which links the Python calls to the C functions by listing:
- the name of the function as it would be called from Python,
- the C function to link to (together with its type),
- the type of arguments the method will take: in our case positional and keyword arguments.
In Python 3.x, there is one additional definition to be made, which is of the
module definition struct holding all information needed to create a module
object. The first element is always PyModuleDef_HEAD_INIT, the second is the
name of the module, then the docstring of the module, -1, and finally a pointer
to a table of module-level functions, described by PyMethodDef values (or
NULL, if there are none). The mysterious “-1” expresses the fact that the
module state will be kept in globals, and not in a per-module memory area. The
latter would be useful if one used multiple sub-interpreters, e.g. when one
wanted to allow more than one thread to be executing at a given time.
We shall now define the methods we declared in _pyoscode.hpp. This definition
will be the wrapper of the C/C++ function solve(), and so will be less general
and reuseable than the structure of the code above. However, the beginnings
(includes, and the definition of the initializing function of the module) of
_pyoscode.cpp are still quite general.
_pyoscode.cpp
_pyoscode.cpp starts with a bunch
of includes and definitions:
#define PY_SSIZE_T_CLEAN
#include "_python.hpp"
#include "_pyoscode.hpp
#include "system.hpp"
#include "solver.hpp"
#define NPY_NO_DEPRECATED_API NPY_1_7_API_VERSION
#include <numpy/arrayobject.h>
In the above, PY_SSIZE_T_CLEAN is a macro that needs to be defined before
including Python.h (which we’ll do later). When passing sized objects (e.g.
arrays), the variable type storing the length of the object is either int, or
Py_ssize_t if the macro has been defined. In the future, Python will only
support the latter type, so we define PY_SSIZE_T_CLEAN for safety.
The macro definition is followed by including the header files we’ll use in this
file, then the definition NPY_NO_DEPRECATED_API, followed by the version of
numpy API the project uses (1.7). This definition ensures that the developers
have a grace period before changes in the numpy-C API break the code. When the
developer updates the NPY_1_7_API_VERSION to NP_1_8_API_VERSION, and they
find that some functionality has been deprecated, they can rest assured that
their past releases will continue to work and they have time to fix the
problems. So in summary, the NPY_API_VERSION should be set to the highest
numpy version that’s been tested.
Finally, we include headers from numpy we intend to use, in this case the
arrayobject.h, since we’ll be using arrays.
We then define the function that initializes the module, which has a special
form that’s different between Python 2 and 3, so we make use of the PYTHON3
flag set earlier:
#ifdef PYTHON3
PyMODINIT_FUNC PyInit__pyoscode(void){
    import_array();
    return PyModule_Create(&_pyoscodemodule);
}
#else
PyMODINIT_FUNC init_pyoscode(void){
    PyObject *m = Py_InitModule3("_pyoscode", module_methods, module_docstring);
    if(m==NULL)
        return;
    import_array();
}
#endif
After initializing the module, we can start wrapping the module’s methods
(pyoscode.solve()), which by convention we’ll call _pyoscode_solve.
static PyObject *_pyoscode_solve(PyObject *self, PyObject *args, PyObject *kwargs){

    int islogw=0,islogg=0,order=3;
    const char* full_output="";
    double ti,tf,rtol,atol,h0;
    std::complex<double> x0,dx0;
    PyObject *tsobj, *wsobj, *gsobj;
    // Define keywords
    static const char *kwlist[] =
    {"ts", "ws", "gs", "ti", "tf", "x0", "dx0", "logw", "logg", "order", "rtol",
    "atol", "h", "full_output", NULL};

    // Interpret input arguments.
    if (!PyArg_ParseTupleAndKeywords(args, kwargs, "OOOddDD|iiiddds",
        const_cast<char**>(kwlist), &tsobj, &wsobj, &gsobj, &ti, &tf, &x0, &dx0,
        &islogw, &islogg, &order, &rtol, &atol, &h0, &full_output))
        return NULL;
    // Interpret input objects as numpy arrays
    PyObject *tsarray = PyArray_FROM_OTF(tsobj, NPY_DOUBLE, NPY_ARRAY_IN_ARRAY);
    PyObject *wsarray = PyArray_FROM_OTF(wsobj, NPY_CDOUBLE, NPY_ARRAY_IN_ARRAY);
    PyObject *gsarray = PyArray_FROM_OTF(gsobj, NPY_CDOUBLE, NPY_ARRAY_IN_ARRAY);
    // If that didn't work, throw an exception
    if(tsarray==NULL or wsarray==NULL or gsarray==NULL){
        Py_XDECREF(tsarray);
        Py_XDECREF(wsarray);
        Py_XDECREF(gsarray);
        return NULL;
    }

    // Get pointers to the data as c++-types
    PyArrayObject *tsarray_arr = reinterpret_cast<PyArrayObject*>(tsarray);
    PyArrayObject *wsarray_arr = reinterpret_cast<PyArrayObject*>(wsarray);
    PyArrayObject *gsarray_arr = reinterpret_cast<PyArrayObject*>(gsarray);
    double *ts = (double*)PyArray_DATA(tsarray_arr);
    std::complex<double> *ws = (std::complex<double>*)PyArray_DATA(wsarray_arr);
    std::complex<double> *gs = (std::complex<double>*)PyArray_DATA(gsarray_arr);

    // Call the C++ functions to construct system and solve
    de_system sys = de_system(ts,ws,gs,islogw,islogg);
    Solution solution(sys,x0,dx0,ti,tf,order,rtol,atol,h0,full_output);
    solution.solve();

    // Build output values
    std::list<std::complex<double>> sol;
    sol = solution.sol;
    int Nsol = sol.size();
    PyObject *pysol=PyList_New(Nsol),*retdict;
    Nsol = 0;
    for(auto it=sol.begin(); it!=sol.end(); ++it){
        Py_complex x_complex;
        x_complex.real = std::real(*it);
        x_complex.imag = std::imag(*it);
        PyList_SetItem(pysol,Nsol,Py_BuildValue("D", &x_complex));
        ++Nsol;
    };
    retdict = Py_BuildValue("{s:O}","sol",pysol);

    // Clean up
    Py_DECREF(tsarray);
    Py_DECREF(wsarray);
    Py_DECREF(gsarray);
    Py_DECREF(pysol);
    return retdict;
}
There’s a lot going on here, so let’s go through it one-by-one:
- The function takes in variables exactly as declared in
_pyoscode.hpp. - We then declare (and define) some local C-type variables to store values of
variables that we’ll input to the C function
solve()we’re wrapping. - The C function
solve()will take in three arrays,ts, ws, gs. We’ll take whatever Python sequence the user provides (tsobj, wsobj, gsobj), and convert them to well-behaved numpy arrays that C understands (tsarray, wsarray, gsarray), then extract the data from these into C arrays (tsarray_arr, wsarray_arr, gsarray_arr). We’ll talk about each of the conversions when we get to the relevant line. - We then define the list of keyword arguments accepted by our C function
solver(). - The next line is how the API parses arguments given to Python functions, via
format strings into local variables. There are three such functions depending on what type of
arguments you’re expecting, here we use the type that will accept both
positional and keyword. The relevant documentation tells you that these format strings are strings of format units, telling C the type of argument to expect. We first pass the args and kwargs from the input of the wrapper, then the format units of the positional and keyword arguments separated by
|. In the format string,Ois any Python object which this function will assign without conversion to a C object pointer.dis for double: this converts a Python float to a C double.Dwill convert a Python complex to a C complex double. The keyword arguments are mainlyi- integers, and there is also ans- string. We finally pass all the local variables these input variables will be assigned to, starting with the keyword argument list, then references to the other variables in the same order as they appear in the format string. - The next line is the first set of array conversions: we use
PyArray_FROM_OTFto convert the user-provided Python sequence into a well-behaved numpy array, with the second and third argument defining what type the array elements must be and any requirements the array must satisfy, respectively. If this conversion is unsuccessful, we’ll have to manually decrease the reference to the objects before returning, because this function always increases the reference count. To safeguard against decreasing the reference count of aNULL, we usePy_XDECREF, which carries out a check first. - we now want to get pointers to the data stored in these numpy arrays. We do
that by calling
PyArray_DATA, but this expects aPyArrayObject, whereas we have genericPyObjects, so we have to perform areinterpret_castfirst. The end of all this is we have pointers to arrays, which we can now pass on to our C++ code! - We do just that in the next few lines - pass the information on to the ODE solver, and let it work.
- Now it’s time to build the return values of our Python function. We’ll be returning a dictionary, with some descriptive keys pointing to lists that contain the solution of the ODE, its derivative, etc. evaluated at a set of time points (which may be internally determined by the solver, or by the user). For simplicity, let’s say we’ll only have one key-value pair in this dictionary, the solution of the ODE.
- The ODE solver returned the solution in the form of a complex-valued list attributed
to a
Solutionobject. So we first declare and define this as a C++ list, and get its size. We also declare the target Python list (note: this creates a new reference which we’ll have to destroy before returning!), and the dictionary to be returned. - We iterate over the elements of this list, and build a C structure
Py_complexfrom the real and imaginary parts of the C++ complex number. We then build a Python complex number (Dis the format string encoding this) from thePy_complex, and set it as the current element of the Python list usingPyList_SetItem. - We build the dictionary to return: using the same format string
logic, we declare that the dictionary maps Python strings to generic Python
obejects,
{s:O}, and identify theOas the Python list we just built. - Finally, we decrease the reference counts of any remaining Python objects.
We’re nearly done. All there’s left to do is to write the Python module’s
__init__.py that defines its member functions as they would be called from
Python, and then build the module. Since we only have one function, solve(), it is rather simple and is
mostly docstring. We must not forget to import, however, the module we just
wrote, _pyoscode :).
import sys
import os
import _pyoscode
import numpy

def solve(ts, ws, gs, ti, tf, x0, dx0, logw=False, logg=False, order=3,
rtol=1e-4, atol=0.0, h=None, full_output=""):
    """Solve a differential equation with the RKWKB method.

    Parameters
    ----------
    ts: numpy.ndarray [float] or list [float]
       An array of real numbers representing the values of the independe
       nt variable at which the frequency and friction term are evaluated.
    ...

    Returns
    -------
    A dictionary with the following keywords and values:
        sol: list [complex]
            A list containing the solution evaluated at timepoints listed under
            the 't' keyword.

    """
    # Set direction of integration if initial stepsize, h, not given
    if h==None:
        h = numpy.sign(tf - ti)
        # Handle the case of ti = tf
        if h==0:
            h=1

    # Run oscode from module library
    resdict = _pyoscode.solve(ts, ws, gs, ti, tf, x0, dx0, logw=logw, logg=logg,
    order=order, rtol=rtol, atol=atol, h=h, full_output=full_output)

    return resdict
The build script
The build script that compiles everything is the setup.py (or setup.cfg, but
with entirely different syntax), which is placed at the top of the directory
tree. Let’s see it:
from __future__ import absolute_import, with_statement, print_function, division
from setuptools import setup, Extension, find_packages
import os
import numpy as np

pyoscode_module = Extension(
    name="_pyoscode",
    sources=["pyoscode/_pyoscode.cpp"],
    include_dirs=['include','pyoscode',np.get_include()],
    depends=["pyoscode/_python.hpp","pyoscode/_pyoscode.hpp"],
    extra_compile_args=['-std=c++11','-Wall']
    )

setup(
    name="pyoscode",
    version="1.0.0",
    packages=find_packages(),
    install_requires=["numpy", "scipy"],
    extras_require={"examples:":["matplotlib", "scipy", "jupyter"],
    "docs":["sphinx","sphinx-rtd-theme","numpydoc"], "testing":["pytest"]},
    setup_requires=["pytest-runner","numpy"],
    tests_require=["pytest","numpy","scipy"],
    include_package_data=True,
    ext_modules=[pyoscode_module]
)
First, we seem to be importing a module named __future__. We aren’t actually
importing a module - this is called a future statement. It’s a compiler
directive which causes the module to be compiled using syntax/semantics that
will be available in a future release of Python, to ease migration to future
versions. It’s also useful for when someone tries to import this module from Python
2.7, where words like print, or the division operator had different meanings
than in 3.x.
setuptools is the library we use to package this Python project. We declare
that we have a C/C++ extension module by constructing an Extension class, and
giving it the following keyword arguments:
name: the full name of the extension (don’t forget the underscore),sources: list of source filenames relative to wheresetup.pylives,include_dirs: list of directories to search for C/C++ header files. The headers our C++ code uses are ininclude/, the headers for the wrapper itself are inpyoscode/, and since we included a numpy header, we need to also include the directory where numpy headers live, which is done automatically bynp.get_include(),depends: a list of files the extension depends on,extra_compile_args: any additional platform- or compiler-specific flags. I just specify which version of the C++ standard library to use, and also tell the compiler to display warnings.
The basic do-everything function is setup(). We now call this with many
arguments (I’ve only included a few, but check out oscode’s repo for
the complete set):
name: the name of the package - this is what you’llimport!version: you guessed it, the version number,packages: the list of packages to be included in the distribution package. Instead of typing everything out, you can just usefind_packages, which without any arguments will just list all packages in.,install_requires,extras_require,setup_requires,tests_require: these all specify dependencies.install_requiresspecifies any other distributions necessary for core functionality that will be installed when the present package is.extras_requireon the other hand lists dependencies of extras, like that of examples, in a dictionary.setup_requireslists packages required for the setup script to run, andtests_requiredoes the same for any tests. An important caveat: say yoursetup.pyimports numpy before thesetup()function is called. This sort of build dependency can only be ensured to be present before the setup script is ran by putting it in apyproject.tomlfile. Again, this is important when distributing your package, not when building it in-place.include_package_data: when True, upon distributing the package,setuptoolsautomatically includes any data files in the package directories that are specified in a file calledMANIFEST.in. This is necessary when e.g. you want to distribute your package via PyPI, i.e. you want people to just be able topip installit. TheMANIFEST.inmakes sure all necessary files are included in the source distribution. When the package is built in-place however, this isn’t required (the files are already there).ext_modules:Extensionclass instances to include, i.e. ourpyoscode_module.
And that’s it! To build your package in-place, just run
pip install .
or
python setup.py install
Summary
Together with this blogpost, and oscode’s repository, this should be enough of a guide to help you write C/C++ extension in Python.
What I haven’t talked about
Future post(s) will discuss the following in more detail:
- distributing your package with PyPI (
pip) - what to do if you have external C/C++ dependencies 😱
- writing unit tests and continuous integration with Travis CI
- open-source licenses and open-source code review